See it renovated first.
A renovation preview takes one photo of a tired kitchen or bathroom and hands back the same room with new finishes throughout. Same walls, same window, same camera: what changes is everything you would have paid a trade to change.
What a renovation preview replaces
Upload one photo of a dated kitchen, bathroom or living room and the tool returns that space after a professional renovation. The dated finishes go: the flooring, the wall surfaces, the ceiling, the cabinetry, the fixtures and the hardware, each swapped for a contemporary equivalent. The lighting is rebuilt as warm layered modern light rather than one dim fitting overhead. The shell holds. Camera angle, room dimensions and the positions of the windows and doors all stay exactly as photographed.
That constraint is the whole value of the output. Because nothing structural moves, the two images sit on top of each other, and anyone looking at them can see precisely which surfaces are being bought. A render that quietly widened the room by half a metre, or slid the window along to where the composition wanted it, would be a nice picture of a different kitchen. This one is a proposal about yours.
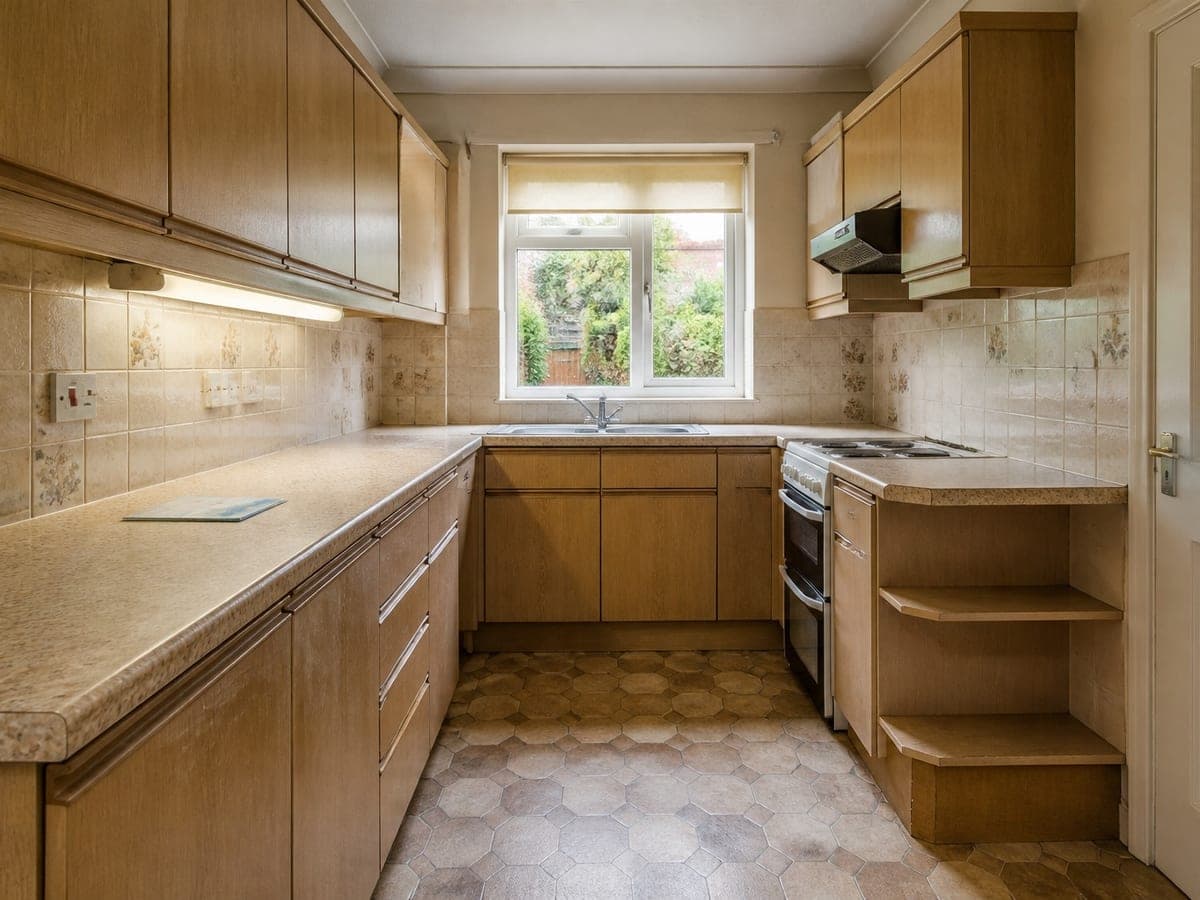 As photographed
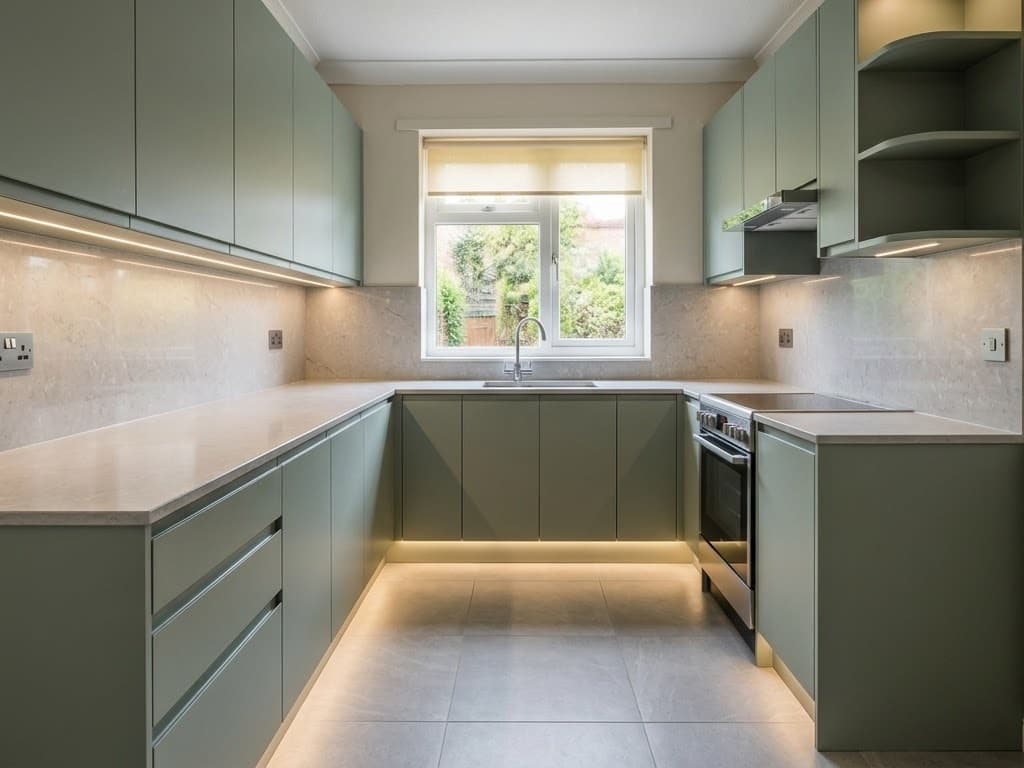 Previewed
The pair above is an ordinary narrow U-shaped kitchen. Nothing was demolished. The run of units, the sink under the window and the garden beyond it are all still there, and the change is entirely in what the doors are faced with, what the worktop is cut from, and what you are standing on.
Renovation preview or a restyle
Interior Design, the restyle tool, answers a different question. You name an aesthetic and it redesigns the look: furniture, textiles, colours and decor, with your layout and architecture left alone. In short, it changes what could leave the room in a van. A renovation preview changes what is screwed, tiled, plumbed or laid, which is the part that needs a trade and a skip outside.
Choose by what you are actually deciding. If the sofa is wrong, restyle. If the cabinet doors are wrong, preview the renovation. When exactly one surface is in question there are narrower tools again: New Walls redoes the wall finish alone, New Flooring swaps the floor and leaves the furniture standing on it. Reach for the renovation preview when several surfaces change together, because that is the point at which the individual choices stop being legible on their own.
Writing a wishlist that steers it
One free text field sits under the upload, labelled Renovation wishlist, and it is the difference between a generic refresh and your renovation. Leave it empty and the tool renovates to no brief in particular, competently and without an opinion. That is a sensible answer to a question you never asked. Fill it in and you are specifying a build.
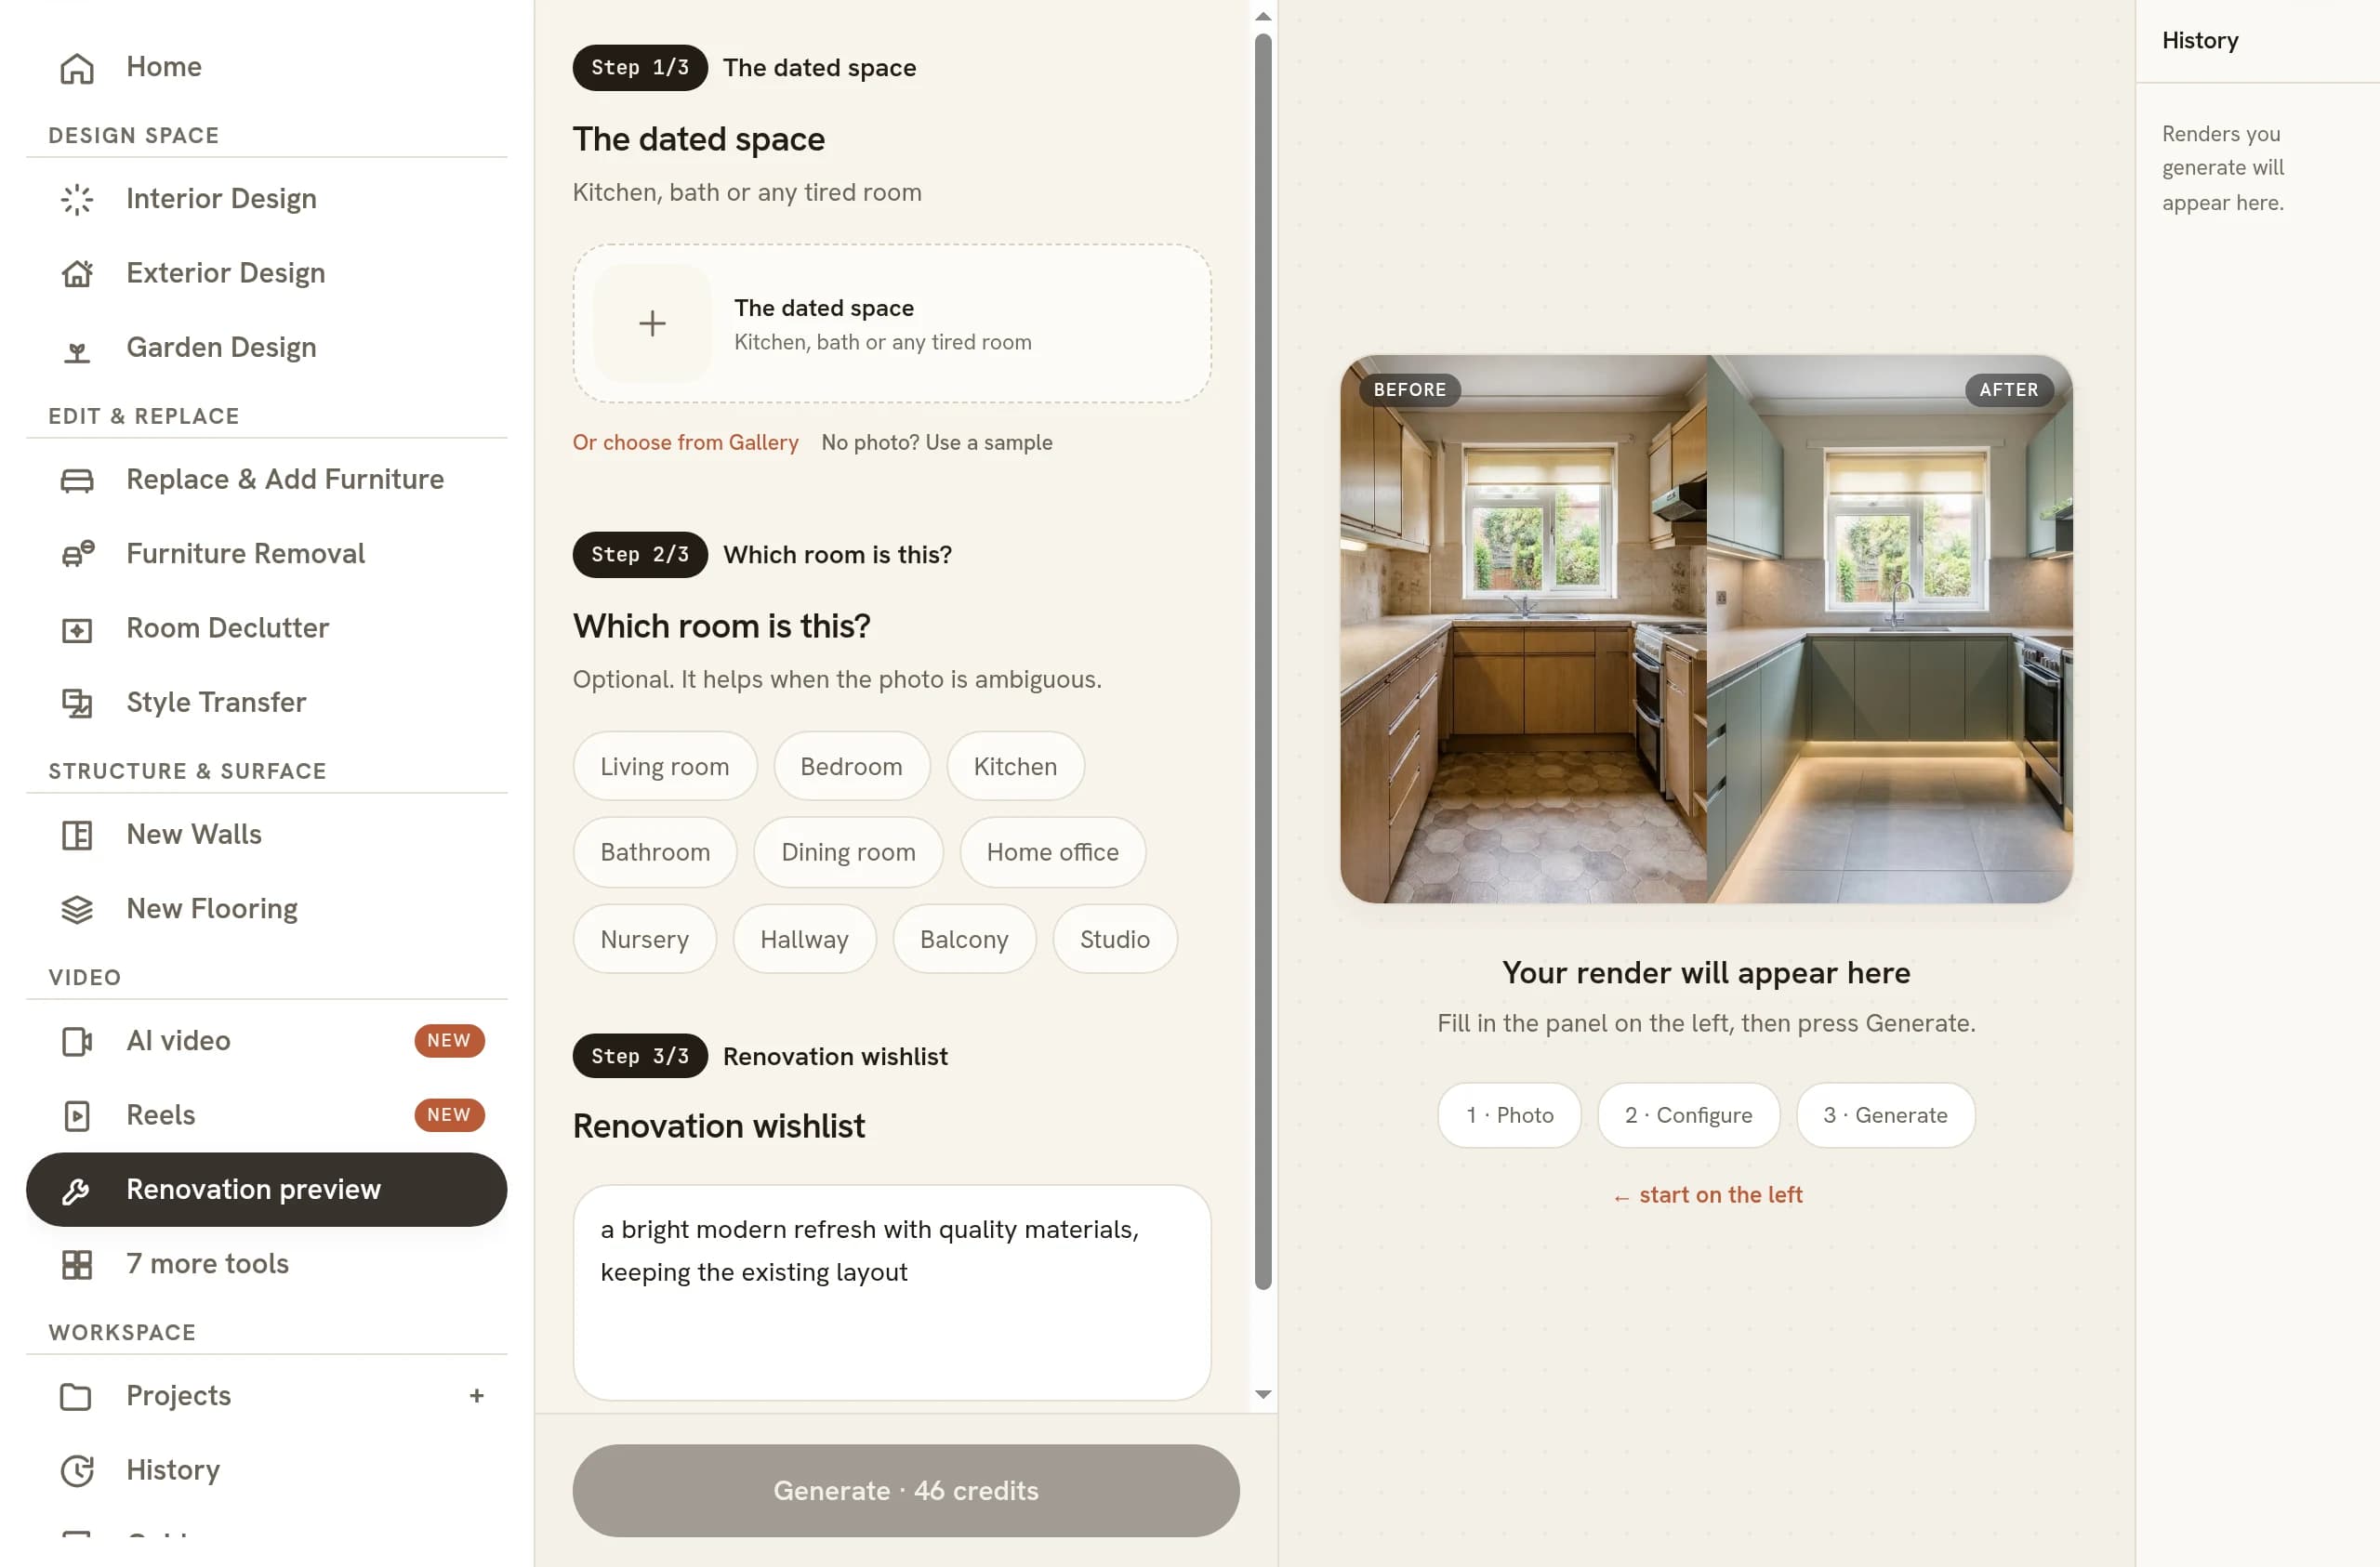
Write materials, not moods. Three to six items, each naming a surface and what goes on it, gets you most of the way there. Work around the room in order, so cabinetry, worktop, splashback, floor, then hardware and lighting. A wishlist that asks for something warm and inviting gives the model nothing to buy.
Name what stays, too. If the window frames were replaced last year, or the floor is a hardwood you intend to sand rather than lift, put it in the same sentence. Keep the whole list to finishes as well. Asking for an island where there is no room for one, or for the door to move a metre to the left, works against the instruction to hold the layout, and what comes back is a preview nobody can build.
Kitchens and bathrooms are where this pays
Both rooms are made almost entirely of purchase decisions. In a bedroom the walls are painted and the rest arrives on a delivery lorry. In a kitchen the doors, the worktop, the splashback, the floor, the tap, the handles and the lights are each a choice with a price attached, and each one is fixed in place the moment it is made. Those decisions also have to agree with one another, which is difficult to judge from a handful of samples held up against a wall in poor light.
It is also where imagination fails hardest. A sage green door under showroom lighting, in a showroom the size of a warehouse, tells you very little about that same door in a narrow galley with one north-facing window. Seeing it at your own camera height, in a photo taken on your phone, is a different order of information. Bathrooms behave the same way, in a smaller room that is harder to frame.
Living rooms are the exception worth naming. Unless you are re-flooring or re-plastering, most of what you want changed in a living room is furniture, and a restyle will serve you better for less thinking.
Using the pair as a contractor conversation
A before and after pair with a locked camera is a specification in disguise. Every visible difference between the frames is a line on a quote, and reading the two side by side with a builder or a fitter turns a vague brief into an itemised one that both of you can walk through surface by surface. You stop describing a feeling. You point at a floor.
It makes scope visible before scope costs anything, too. Generate two or three previews from the same photo with different wishlists: a paint and hardware refresh, a doors and worktop job, a full strip out. Put them in order and the price steps get easier to argue about, because everyone can see what each step buys. That is the old case for visualising work before committing to it, minus the modelling step that used to sit in front of it.
Be straight about what the pair is. It does not know the condition of the pipework, whether a wall is load bearing, or what any of it will cost. Treat it as the picture that starts the quote rather than the thing being quoted, and hand your wishlist over with it so the trades price the same materials you were looking at.
Checks before the pair leaves your hands
Open both images full size and flick between them. The window should be the same shape in the same place, the doorway should not have drifted, and the run of units should start and stop where it did. Anything that moved is the model redesigning rather than refinishing, and it is worth another attempt with the layout named explicitly in the wishlist.
Then check the new pieces are the right size for the room. Wall cabinets reaching a ceiling they cannot reach, or a worktop grown deeper than the units beneath it, are the usual tells, and the reasons renders get scale wrong apply here as much as anywhere. Look at the hardware last. Handles and taps are small, and they are where an otherwise convincing preview tends to come apart.
Once the pair holds up it travels. Relight the finished frame to see the kitchen after dark, or turn it into a short clip for the people who were not in the room when you decided. If the property is being sold rather than lived in, it is worth reading on whether a staged image earns its keep before the pair goes anywhere near a listing.
Common questions
Is there an app that shows what your house would look like renovated?
Yes: upload one photo of the dated room, add a short wishlist of materials, and a renovation preview returns the same space finished. It runs in the browser, so there is nothing to install. The result is a picture of your own room rather than a showroom shot or a mood board.
How accurate is an AI renovation visualiser?
Accurate about appearance, not about specification. It holds your room's geometry and light, so the finishes read at the right proportions in the right space, which is what most material decisions turn on. The pieces themselves are plausible contemporary equivalents rather than catalogue products, so treat the image as a look to match when you shop, not a parts list.
Do I need a floor plan or measurements for a renovation preview?
No. One photograph of the room is the only input, and the tool reads the space from it. Measurements still matter when you come to order materials, but they are not needed to see the finishes. If you have a plan and want a furnished drawing out of it instead, that is a different tool entirely.
What photo works best for a kitchen renovation preview?
Stand in the doorway, hold the camera at chest height, and take the widest frame the room allows with the daylight on. Clear the worktops first, because anything left out gets rendered back into the finished image. One straight shot beats several angled ones.
Can I use a renovation preview in a property listing?
Only with a clear label. An image showing finishes that do not exist yet makes a claim about the property, and buyers arriving at a viewing will compare. Mark it as a renovation visual, keep the unedited photograph beside it, and it reads as a useful illustration of potential instead of a misleading one.
Try it on your own plan
Upload a floor plan or a room photo and see the first renders in about thirty seconds.
100 free credits · no credit card required
Get the next guide when it lands
We publish these as we work through what people actually ask about pricing, staging and turnaround. Leave an address to hear when a new one goes up.
We only use your address to email you about RoomGen. Privacy policy · Terms