A renovation reveal reel that ends on your render.
Tired room, work under way, finished space. A renovation reveal reel tells a before and after in three stages. This Reels template builds the first two from a render you have already signed off, so the reel ends on the design your client approved.
Updated · RoomGen Studio
What the renovation reveal template makes
The template makes a short renovation timelapse in vertical video: one room in three stages. First comes the room before any work started, empty and tired. Then the same room under construction, with paint drying, flooring going in and tools about. Last comes your own finished render. Two clips carry the room from stage to stage: Before → Construction, then Construction → Reveal. They are stitched into a single video.
You supply only the last stage. The two earlier ones are the template’s keyframes, the stills the video travels between. Both are generated from your render as the same space at earlier points in its life, and you see each one before any video is made. The video then moves between exactly the keyframes you confirm. So the room a viewer arrives in is the one your client signed off, down to the sofa and the light fittings, not a close relative of it.
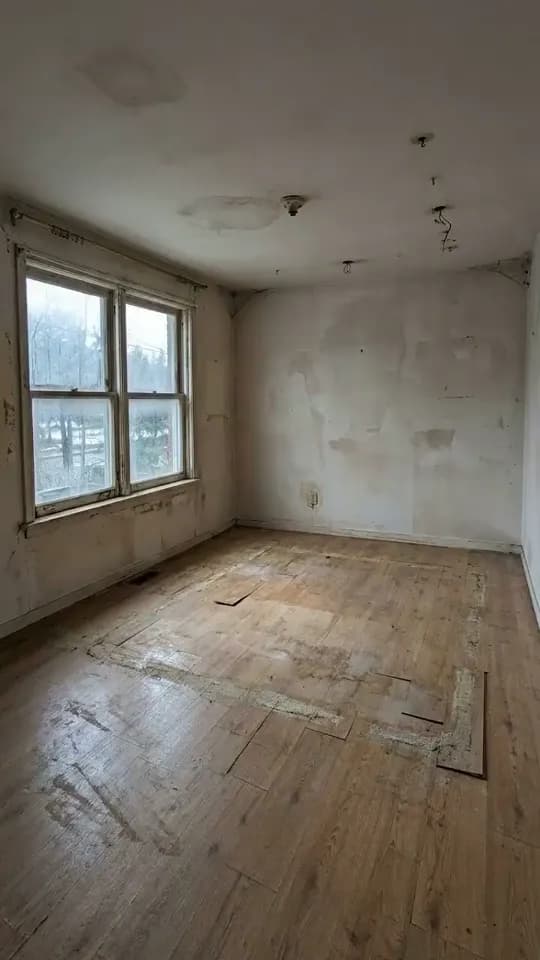
Before renovation
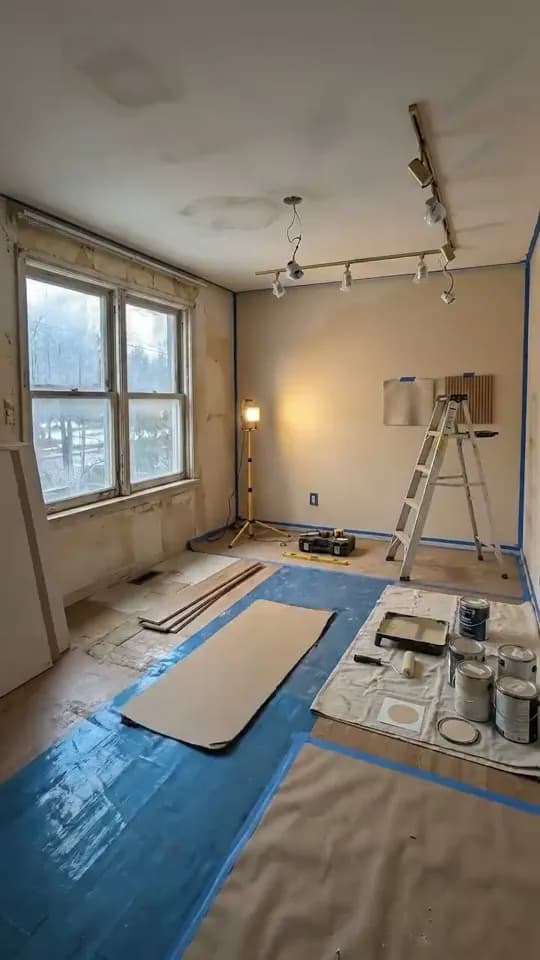
Under construction
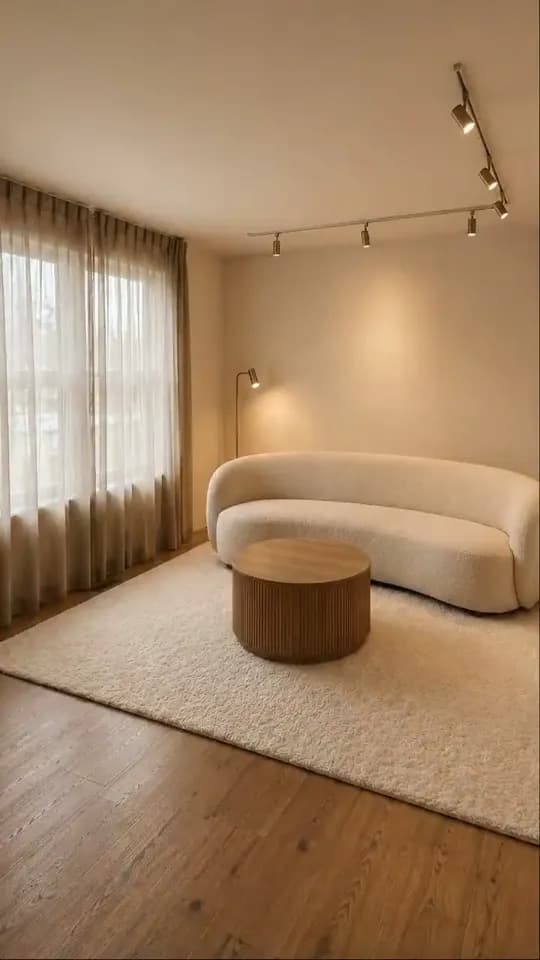
Reveal: your render
| Stage | What it shows | Where it comes from | Keyframe cost |
|---|---|---|---|
| Before renovation | The room empty and tired, before any work started | Generated from your render, or your own still from the Gallery or an upload | 150 credits per generation; your own still is free |
| Under construction | The room mid-renovation, with paint drying, flooring going in and tools around | Generated from your render, or your own still, such as a site photo | 150 credits per generation; your own still is free |
| Reveal | Your finished design | Your render, centre-cropped to 9:16 if it is landscape | Nothing extra |
The video is priced separately, on the Settings step, by the tier and resolution you pick. The template’s own preview, below, shows the effect played through. It is a longer cut than the reel you will make.
When to choose it over other reels
Choose a renovation reveal when the building work is the story and the old room is part of it: a kitchen, a bathroom, a full refurbishment. The furniture templates change what stands in a room. This one changes the room. A furniture pop-in reel fills an emptied room with its furnishings; a renovation reveal changes the walls, floor and ceiling as well. If the room had no meaningful before, such as a new build or a bare shell, a room-builds-itself reel fits better. For all nine templates side by side, and the Reels steps they share, see the guide to interior design reels from a render.
Which renders make a convincing reveal
Pick a render that shows the parts of a room a renovation touches: a good stretch of floor, at least one clear wall, the ceiling line and ideally a window. In the preview, each of those gets a before and an after. A render that is mostly sofa and cushions leaves little of the room to show changing. The reveal then turns into a furniture reveal with some dust added.
Plan for the vertical crop. Every reel is 9:16, and a landscape render loses its sides to reach that shape, so keep the subject in the middle third of the width. Here the subject is the fabric of the room, so the strip that survives should still hold floor, wall and ceiling. The tall frame suits a renovation, because much of the change sits at the top and bottom of the picture. Bare wires turn into lighting overhead, and new boards run out underfoot.
Keep the architecture legible. You will judge the two keyframes against your render, so windows, doors and the ceiling line need to read plainly in it. A wall lost in shadow or a window burnt out to white leaves you less to check against.
Settle the design before you animate it. If the client is still choosing between two floors or two wall colours, resolve that on the still first, with a renovation before and after preview. The reel should end on the scheme you are proposing, not on one of the options. If the project exists only as a plan so far, render a room from the plan and run the reveal on that. When the plan itself is what you want to show, the Blueprint build reel is the template made for it.
Making a renovation reveal reel in RoomGen Studio
The whole job takes one render and a handful of decisions. You pick a template and a render, then a four-step wizard runs Frames, Settings, Generate and Result.
- Open Reels. Find it in the VIDEO group of the studio sidebar. Choose Renovation reveal from the template panel, or press Expand to compare it with the rest of the library at full size.
- Pick the render. Choose the one finished render the reel should end on: the scheme you are proposing, not an option.
- Review the keyframes. On the Frames step, Before renovation comes first, then Under construction. Generate each keyframe (150 credits) or use your own still, regenerate either one with a short instruction if needed, and confirm them in that order: Under construction opens once Before renovation is confirmed.
- Choose the settings. Pick Fast or Quality, and 720p or 1080p. Each clip runs four seconds; there is no length setting. At 1080p Fast and Quality cost the same; only at 720p is Fast cheaper. The Generate button shows the exact credit total before you commit, and the chip beside it shows how many reels at that price your balance can pay for.
- Generate. The Generate step lists both clips and the stitch as they complete. If a clip fails, a Retry button appears beside it. A clip that has already finished stays saved.
- Collect the result. The stitched MP4 and both clips are saved to the project’s Gallery, ready to download.
Two generated keyframes stand between your render and the video. The reel is only as convincing as the weaker of the two, so give the Frames step your time. If you need to step away, close the wizard. When you come back, Reels shows a “You have a reel in progress” message so you can pick up where you left off, and anything already paid for is kept.
Checking the before and construction keyframes
Continuity first. Read each keyframe for continuity before mood. Hold it against your render and check the fixed parts of the room. The window should sit in the same place at the same size, the ceiling at the same height, and the floor should run the same direction. Any doorway should be where it was. A keyframe that quietly moves a window produces a clip that seems to cut to another room, however good it looks on its own.
Then the sequence. The keyframes come in order, and each locks once you confirm it, so judge the before keyframe on its own first: it should look like this room on the day you first surveyed it, empty and worn, but plainly the same shell. Then judge the construction keyframe against it: this room partway to your design, with the work visibly under way. If either reads as a different room or a different project, fix it before you confirm it.
One change at a time. When a keyframe is close but not right, regenerate it with a short, plain instruction about one physical thing, such as “fewer tools on the floor”, “flooring half laid” or “keep the window frames white”. Each regeneration is a new version, so a short instruction about one thing is easier to check in it.
Real photos where you have them. The Frames step accepts your own still for either stage, from the Gallery or as an upload, at no charge. A photo of the empty room gives the reel a true starting point, and a site photo from the works can stand in for the construction stage. Either needs to share the render’s viewpoint, or near enough. Otherwise the clip has to cover a change of camera position as well as a change of state.
If the render began as a redesign of a room photo, that original is the obvious before keyframe, since the two usually share a viewpoint. If it still shows the previous occupant’s furniture, clearing the furniture from the photo gets you an empty before of the actual room. Treat that as a close approximation: the wall and floor that stood behind the furniture are filled in, not photographed.
Where a renovation reveal earns its place
On your own channels, a reveal is a project announcement with a plot. A finished still shows what a room looks like. A reveal shows what the design did to it, which is the part of a designer’s or architect’s work a single image struggles to carry.
In a client presentation, the reel tells the proposal in order: the room as the client knows it, the disruption they are signing up for, then the result. Pass a phone across the table and it plays in a few seconds. Because it ends on the render already in your deck, the reel’s final frame and the presentation match.
On a listing, estate agents and developers marketing a property with renovation potential can use it to show what a tired room could become. That use needs the clearest labelling, covered in the limits below.
As a teaser, the second clip can go out on its own. Both clips are saved separately as well as stitched, so Construction → Reveal can run as a four-second post ahead of the full reel.
Captions, music and text overlays go on in the app you post from. The MP4 is already the full-screen vertical shape used by Instagram Reels, TikTok and YouTube Shorts. Preview it in that app before you publish. Each platform lays its own buttons and caption over the frame, and text near the top, the bottom or the right-hand edge can disappear under them. In a reveal like the preview, the safest place for a line of text is the plain back wall. Keep it below the ceiling lights and above the furniture, clear of the overhead and floor-level change that the reel is there to show.
What a renovation reveal does not show
It is not a record of work. A renovation reveal shows design intent. Unless you supplied your own photos, the before and construction stages are pictures generated from your render: a plausible past for the room, not its actual history. The reel compresses a renovation that may not have happened yet, and will not happen in exactly that way. Say so wherever someone might take it as evidence.
On a listing, caption it as a visualisation of a proposed renovation, never as completed works. Follow the disclosure rules of the market you sell in, and take the same care as with any AI video on a property listing. Even with real photos for the first two stages, the ending is still a render.
The construction stage is illustration. A stepladder and paint tins suggest work in progress, but they do not describe your programme of trades. Do not use the keyframe to explain one to a client.
The format is fixed. It is always two clips and always 9:16, with no length setting. A project with a longer story needs a second reel from another room, not a longer version of this one. A finished reel also has no redo button. If a clip completes but looks wrong, the fix is a new run, as the questions below explain.
Reels is on paid plans. Run the sample project once to see a renovation reveal through every step free, then pick the render whose floor, walls and ceiling survive the crop.
This guide is kept by the RoomGen Studio team and describes Reels as it works on 28 September 2026. You can read more about RoomGen Studio and how the team works.
Common questions
Can I use a real before photo instead of a generated one?
Yes. On the Frames step you can replace either generated keyframe with your own still, from your Gallery or as an upload, and that costs nothing. A genuine photo of the empty room gives the reel a true starting point, and a site photo can do the same for the construction stage. Take them from roughly the same position as your render, or the opening will look as if it moves to a different room.
How long is a renovation reveal reel?
About eight seconds. The template makes two four-second clips, Before → Construction and Construction → Reveal, and stitches them into one video. There is no length setting. The template preview on this page runs about sixteen seconds, so your own reel moves through each stage faster than the preview does.
How many credits does a renovation reveal use?
Each keyframe the studio generates costs 150 credits. A first pass at the two earlier stages comes to 300, plus 150 for each regeneration, and nothing for any stage where you supply your own still. The video is priced on the Settings step and depends on the tier and resolution you choose. The Generate button shows the exact total before you commit, and the chip beside it shows how many reels at that price your balance can pay for. No video credits are taken until you press it.
What happens if a clip fails or comes out wrong?
If a clip fails outright, the Generate step marks it as failed and offers Retry for that clip alone. A clip that finished is already saved to the project’s Gallery. If only the stitch fails, you can retry the stitch without remaking the clips. A clip that finishes but looks wrong has no redo button: start a new renovation reveal from the same render. That run starts again at the Frames step. Each keyframe you generate there is a new charge, your own still is free, and the Generate button prices the video again. Before you pay twice, check whether the fault began in a keyframe, and fix that first.
Can I use a renovation reveal on a property listing?
You can, as long as it is labelled as a visualisation. Unless you supply your own photos, the before and construction stages are generated from your design, so the reel shows a proposed transformation, not works carried out on the property. Caption it as a design proposal or a renovation idea. Keep it apart from the photographs that document the building as it stands, and follow the disclosure rules of the market you sell in.
Can I make a renovation reveal from a floor plan?
Not directly. This template starts from one finished render of a room, and the reel ends on that render. Render the room from the plan first, then run the reveal on that image. If you want the plan itself to become the video, the Blueprint build template is made for that, and it keeps the plan whole instead of cropping it.
Try it on your own plan
Upload a floor plan or a room photo and see the first renders in about thirty seconds.
100 free credits · no credit card required
Get the next guide when it lands
We publish these as we work through what people actually ask about pricing, staging and turnaround. Leave an address to hear when a new one goes up.